Herein lies the chronicle of my attempts to learn how to make a game from scratch. I have three goals: First, to provide a place to record my thought process, experience, milestones, and pitfalls on my way to making my first “shippable” game. Second, to share knowledge and experience for others to learn. Third, to provide motivation. Please comment and share if you like what I have written ~Nathan
Thinking Through The Logic
Ok, in Part 1 I covered how I broke down Flappy Bird into its major components. You’ll notice I left out some key elements of a “finished” game, like sound, scoring, and the start screen. I’ll add those elements soon, and cover it in Part 3 next week. For now, I want to show the process of getting the core gameplay up and running.
Please bear in mind that almost immediately after Flappy Bird came out, hundreds of clones appeared for sale and as tutorials in various Game Enginetutorials, including Game Maker. I’m not trying to be one of those people; I’m merely using Flappy Bird to teach myself and share my thoughts. I have no idea if this is one of the better ways to do it; in fact I’m pretty sure it’s not.
ANYWAYS.
Let’s begin. The first thing I did was add the background images, then I created a room and added the two backgrounds. You can see from the checkbox, that I tiled the backgrounds horizontally, and made the rest of the room color match the sky portion of the background since it doesn’t reach the top of the room. Game Maker has the ability to set your background images to move in any direction, so I set the horizontal direction to -2
Click to view Full Size!
A word About Movement
Game Maker operates on a frame-by-frame basis. This usually manifests as “steps” in the code. You start by setting your framerate in the room (mine is set to 60 frames per second). Then before every frame, Game Maker reads all the code and executes whatever commands you have programmed in. So, if I set the horizontal speed to -2, that means that every frame (or every 1/60th of a second), Game Maker moves that background 2 pixels to the left, or approx. 1.5″ every second.
Objects
After adding the backgrounds, I began creating and adding objects. It’s important to note that objects and sprites exist separately until you combine them. The reason for this is that objects exist to contain and execute code. You’ll often have objects that need to exist, but don’t need to be visible or interacted with by the player (things like weather, random enemies spawning, random encounter generators, etc). Objects also house all the code that makes sprites interactive. You attach a sprite to an object, and suddenly you have something your player can interact with. So for each appropriate object, I attach the relevant sprite.
For me, the first object to to consider was the Pipes. Now, I could have created a Pipe object, and placed a bunch of them to the right of the viewable room, and insert some code in the pipe object that would make the pipes move from right to left in time with the background. But there are two problems with that: First, Flappy Bird has random pipe locations, in that the opening is at a random height each time you start over. Second, eventually someone would reach the end of my placed pipes, or I’d run out of memory, or time.
Instead I opted to have the pipe objects be created just off screen to the right, with a random height, move across the visible area, then be destroyed just off screen to the left. I decided to handle this by creating a second, invisible object that I called obj_pipe_generator to handle building pipes.
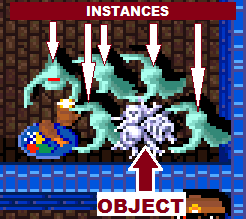
The ghosts spawn from the pile of bones.
Objects Vs. Instances
Did you ever play the arcade game Gauntlet? In the classic arcade game, monsters attack in huge waves. The monsters spawn from a sort of monster generator. in the picture above, those ghosts come from the pile of bones. All ghosts are created with the same behavior, look, and lifespan, created by the pile of bones. In programming, the pile of bones is the object, and the instances are the ghosts. If you build an object in your code that describes how a ghost will look and move, then to make that ghost appear, you create an instance of that ghost object. All instances behave the same, based on their object, but you can treat each instance as its own separate entity once it is spawned. Instances take up memory, so be careful to destroy instances that leave the playfield, or are no longer useful (such as when you kill a ghost).
Note that when you destroy an instance, all the information about that instance is also destroyed, so if you create a new instance, it starts fresh, with no memory of what happened to the other instances.
Back to my object discussion…
Obj_pipe_generator would wait a set amount of time, then create an instance of obj_pipe at a predefined X location and a random Y location, wait another set amount of time, create the next instance, and so on, until the game was reset.
Obj_pipe would move itself at a set pace, until it’s X coordinate reached a certain point, then destroy itself.
Aside from Mario, the only other object I needed for the core gameplay is the floor. It’s currently a repeating background image that is scrolling. What I chose to do here was create an obj_floor that is solid, and the width of the screen. Obj_floor is solid, and will have the same collision properties as obj_pipe, but it will be hidden behind the background image of the floor. It doesn’t need to move. It doesn’t even need to be the width of the screen, since Mario never moves horizontally.
Alternative Options
So this was just the method I chose. to generate my pipes and floor objects. I could just as easily have made the top and bottom pipes separate objects. This would have been useful if I wanted to vary the distance between the upper and lower pipes for added challenge or variety. I could also have made the pipes create themselves when they reach a certain X coordinate, instead of having a separate object that creates them
For the floor, I could have created an animation of a section of the floor moving, and tiled the area with floor objects; this would have eliminated the need to a separate obj_floor that is hidden. If I wanted to vary the height of the floor this would have been a good move. If I wanted to minimize the amount of work, I could have the Mario object just monitor its own height, and if Y went below (or above, since going down means higher and higher Y values) a certain threshold, Mario would instantly die.
You can see how thinking through what you might want to do later in a game’s development cycle, or making choices early on that are more extensible later can be very important.
Obj_player was the last object I needed to create. This object would hold the gravity information, as well as a speed variable. The gravity variable would modify the speed variable so that Mario would fall faster and faster, and also to create the gradual slowing down of Mario’s upward motion. I also needed to have this object “listening” for keyboard input so that every time the spacebar was pressed, the “flap” or jump action would occur.
Interactions
With all the pieces in place, I now need to actually give the flapping mechanic a fail condition. In other words I need to have collision code. Right now, if I ran the game, the background would move right to left, pipes would appear on the right at varying heights and move right to left along with the background, and Mario can flap his way up or not flap and fall down. But Mario will happily flap right through both the pipes and the floor with no consequences. There are no losers in my game right now, because there is no fail condition. Therefore we need to add code to create consequences when Mario collides with a pipe or the floor.
The collision code will live inside obj_player, and will have to interact with the obj_floor, and obj_pipe instances. Since the result of a collision is the same for both objects (all stop), I can create a parent object and have Mario’s collision code react to that object.
Parent Objects Vs. Regular Objects
A parent object starts out as a normal object until you assign it as the parent of another object. In GameMaker, this is an option. Every object gives you the option to assign another object as its parent. Once you do this, all of the “parent” object’s characteristics are inherited by the child object. Parent objects also behave like an umbrella, grouping objects together.
In this case, I created a par_wall object, assigned it as the parent object to obj_pipe and obj_floor, and wrote obj_player’s code to detect collisions with par_wall. Even though there are no instances of par_wall anywhere on the screen, Mario’s code will treat all objects that have par_wall as a parent the same.
Finally, although I’m not making any of the wrapper components like a start screen or game over screen, I will still want to be able to restart the game quickly as I test various aspects of the game. A simple keypress should be enough, and Game Maker has a simple function for restarting your game.
This post has already gotten too long, so I’ll cover the actual code parts on Wednesday.